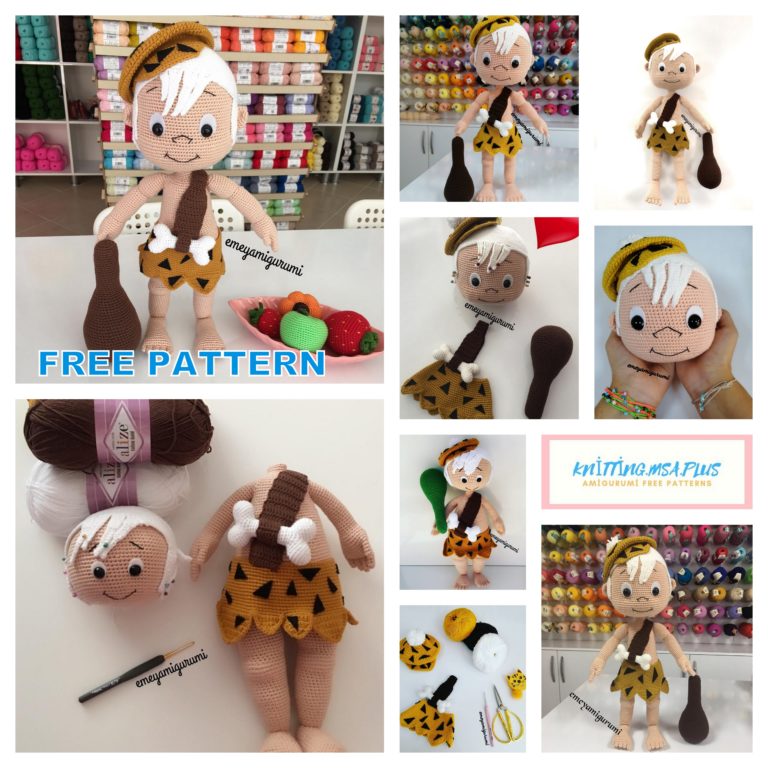
Amigurumi The Flinstones Free Crochet Patterns
Measurements: 32 cm
Difficulty: High
Estimated time: 12 h
Crochet hook: 2-3 mm
PEDRO PICAPIEDRA
Amigurumi pattern
Designed by Sueños Blanditos
MATERIALS
– Wool of different colors: white, black,
blue, orange, flesh color, flesh color more
Dark.
– Wool thickness: 3-4 mm.
– Crochet hook suitable for the thickness of the wool.
– Needle to sew wool.
– Synthetic filling.

ABBREVIATIONS
Sc: single crochet
İnc: increase
Dec: decrease
Fill as we knit.
If you have questions about the points you can visit
Tutorial Basic Points for knitting amigurumis
Thank you very much for purchasing my pattern.
I hope you enjoy knitting it!
If you have any questions write me at:


FEET / LEGS
Fingers (x3):
In flesh color
1. Magic ring into 8 sc.
2. At 4. 1 sc at each point (8).
We finish off.
We knit two fingers and finish them off,
we leave the third finger unfinished to
start finger joining:
1. With 1 sc we pass to another finger, we knit
3 more sc and go to the last finger with 1
sc. We knit 7 sc and repeat the same
sequence on the other side. We will have 24
points. (3 fingers x 8 sc).
2. 1 sc at each point (24).
3. “2 sc, dec”, repeat until the end of the
turn (18).
4. 1 sc at each point (18).
5. We mark the first corner from the
needle position, i.e. the first
corner we would reach if
continue to knit and knit 1 sc in
each point until you reach it.
6. Once in the corner we make a
chain is separated and we turn, to
start knitting straight 9 sc (9).
7. To 10. Separation chain, we turn and
knit 1 sc in each stitch (9).
11. Separation chain, we turn and
we skirt the whole piece with sc.
We will have 32 sc. (32).
12. We place the lap marker,
Well, we knit again in the round.
We do 8 sc, 1 dec, 20 sc, 1 dec (30).
two
13. 1 sc at each point (30).
14. 1 dec, 2 sc, 1 dec, 2 sc, 1 dec, 20
sc (27).
15. 1 dec, 4 sc, 1 dec, 19 sc (25).
16. 2 sc, 1 dec, 21 sc (24).
17. “2 sc, dec”, repeat (18).
18. To 24. 1 sc at each point (18).
25. “5 sc, inc”, repeat (21).
26. To 28. 1 sc at each point (21).
29. “6 sc, inc”, repeat (24).
30. At 39. 1 sc at each point (24).
40. We change to orange and knit 1 sc
at each point (24).
We finish off the first leg.
We knit the second following the same
pattern and leave it unfinished to
start joining the legs:
We put one leg next to the other and
We mark the central point between them.
We knit in the second leg that
leave 1 sc unfinished at each point
until you reach the marked point. we passed
with 1 sc to the first leg. We knit in
she 1 sc at each point until reaching
back to the marked point, we pass with 1
sc to the second leg and complete the
Union.
We close the gap between the legs with the
wool needle. We continue weaving the
BODY:
1. In total there will be 48 points.
2. “6 sc, dec”, repeat (42).
3. At 5. 1 sc at each point (42).
6. “6 sc, inc”, repeat (48).
7. 1 sc at each point (48).
3
8. “7 sc, inc”, repeat (54).
9. 1 sc at each point (54).
10. We change to the flesh color and weave
1 sc at each point (54).
11. “8 sc, inc”, repeat (60).
12. To 20. 1 sc at each point (60).
21. “8 sc, dec”, repeat (54).
22. 1 sc at each point (54).
23. “7 sc, dec”, repeat (48).
24. 1 sc at each point (48).
25. “6 sc, dec”, repeat (42).
26. To 28. 1 sc at each point (42).
29. “5 sc, dec”, repeat (36).
30. At 32. 1 sc at each point (36).
33. We knit at the top of the
chains 1 sc at each point (36).
We will return to this round to knit the
dress.
We finish off.
DRESS
In orange
1. We start from turn 33 of the body and
we will knit with the doll’s feet towards
above, in the part of the chains that
was released.
First we mark the 4 central points
in front. We start knitting for the
back and we are knitting 1 sc in each
point until you reach the points
marked. We don’t weave over them, but
that we make 10 chains out of them.
We re-hook in the fabric a
once you have passed those 4 sc and we finish
round with 1 sc at each point (42).
4
2. 1 sc at each point (42).
3. “6 sc, inc”, repeat (48).
4. 1 sc at each point (48).
5. “7 sc, inc”, repeat (54).
6. 1 sc at each point (54).
7. “8 sc, inc”, repeat (60).
8. To 10. 1 sc at each point (60).
11. “9 sc, inc”, repeat (66).
12. 1 sc at each point (66).
13. “10 sc, inc”, repeat (72).
14. 1 sc at each point (72).
15. “11 sc, inc”, repeat (78).
16. At 30. 1 sc at each point (78).
31. “11 sc, dec”, repeat (72).
32. And 33. 1 sc at each point (72).
34. “10 sc, dec”, repeat (66).
35. To 37. 1 sc at each point (66).
38. “9 sc, dec”, repeat (60).
39. At 42. 1 sc at each point (60).
Without finishing off, we will knit the First
Tip:
In orange
1. 6 sc.
2. To 6. Without separation chain
we will lose 1 sc in each row until
we only have 1 sc.
We finish off.
In total we will make 12 points.
ATTENTION: We do not leave any sc of separation between the tips, but we start the
next point at the last point of the previous one. In this way, each tip, even if it has 6
sc, actually occupies 5. Therefore we can knit 12 in total.
When knitting the last point, we do not finish, but we border all with sc to refine the silhouette.
5
DRESS SPOTS (x12)
In black
1. 4 chains on which we knit 3 sc.
2. Without separation chain, we rotate and
we lose 1 sc (2).
3. Finally, without chain, we turn and only
we will have 1 sc.
We finish off.
In this way we will make the 12
triangles that we will sew to the dress.
ARMS (x2)
Fingers (x3):
In flesh color
1. Magic ring into 6 sc.
2. At 5. 1 sc at each point (6).
We knit two fingers and finish them off,
we leave the third finger unfinished to
start finger joining:
1. With 1 sc we move to another finger,
we knit 2 more sc, we go to the third
finger with 1 sc and we knit 5 more sc.
We repeat the same sequence for the
other side. We will have 18 points. (3
fingers x 6 sc).
2. At 5. 1 sc at each point (18).
6. “4 sc, dec”, repeat (15).
7. “3 sc, dec”, repeat (12).
8. 1 sc at each point (12).
9. “1 sc, inc”, repeat (18).
10. “2 sc, inc”, repeat (24).
6
6. At 25. 1 sc at each point (24).
26. “6 sc, dec”, repeat (21).
27. 1 sc at each point (21).
28. “5 sc, dec”, repeat (18).
29. “4 sc, dec”, repeat (15).
30. “3 sc, dec”, repeat (12).
31. We change to orange and knit 1
sc at each point (12).
32. On top of the chains
knit 1 sc in each stitch (12).
We will return to this lap to complete
the sleeve.
We finish off.
Thumb:
1. Magic ring into 8 sc.
2. At 4. 1 sc at each point (8).
We finish
WE COMPLETE THE SLEEVE:
1. We start from lap 32 of the arms
and with the doll’s hands up,
we knit in the part of the chains that
1 sc, 1 double double, 2 sc, 2
double double crochet, 2 sc, 2 double double crochet, 2
sc. We finish off.
7
HEAD
In flesh color
1. Magic ring into 6 sc.
2. İnc at all points (12).
3. “1 sc, inc”, repeat (18).
4. “2 sc, inc”, repeat (24).
5. “3 sc, inc”, repeat (30).
6. “4 sc, inc”, repeat (36).
7. To 10. 1 sc at each point (36).
11. “11 sc, inc”, repeat (39).
12. To 14. 1 sc at each point (39).
15. “12 sc, inc”, repeat (42).
16. To 18. 1 sc at each point (42).
19. “13 sc, inc”, repeat (45).
20. To 22. 1 sc at each point (45).
23. “14 sc, inc”, repeat (48).
24. To 26. 1 sc at each point (48).
27. “15 sc, inc”, repeat (51).
28. At 30. 1 sc at each point (51).
31. “16 sc, inc”, repeat (54).
32. To 34. 1 sc at each point (54).
35. “7 sc, dec”, repeat (48).
36. “6 sc, dec”, repeat (42).
37. “5 sc, dec (36).
We finish
8
BEARD
A little darker in flesh color
1. 13 chains on which we weave 12
sc.
2. Separation chain, we rotate and
knit 1 sc in each stitch (12).
3. To 5. In each of these rows
we will increase 2 sc. For this we will do 2
chains before turning (one will serve
separation and another as increase),
we will knit 1 sc in each stitch in the rest
and we will make 1 inc in the last point. From
this way we will get 14, 16 and 18 sc
successively.
6. To 9. Separation chain, we turn and
knit 1 sc in each stitch (18).
10. Without chain before turning and
doing a decrease with the 2
last sc, we will lose 2 sc (16).
11. 1 sc at each point (16).
12. Again we will lose 2 sc as in
row 10 (14).
13. Separation chain, we turn and
knit 1 sc in each stitch (14).
14. We lose another 2 sc (12).
15. 1 sc at each point (12).
16. We place the lap marker
to pass to knit in the round bordering
the whole piece with sc.
We finish off.
We sew to the face matching the piece by
down to the head hole. Prior to
close completely fill in but
just the bottom.
HAIR
In black
1. Magic ring into 6 sc.
2. İnc at all points (12).
3. “1 sc, inc”, repeat (18).
4. “2 sc, inc”, repeat (24).
5. “3 sc, inc”, repeat (30).
6. “4 sc, inc”, repeat (36).
7. “5 sc, inc”, repeat (42).
8. 1 sc at each point (42).
9. 12 sc (we leave the rest unwoven).
10. To 13. Separation chain, we rotate
and we knit 1 sc in each stitch (12).
14. We place the lap marker
to knit in the round and we skirt the
piece with sc. (52).
We finish off.
To facilitate the assembly of the different
parts of the hair we will be guided by the
next division of the 52 points that
we have:
• The nape part consists of 22 sc and
on it we will not add any piece.
• Below are the Patillas, one by
each side. Its space consists of 9
sc each. We will sew upon them the
corresponding piece of 18 sc folded
to the half.
• Finally we have the front, the
Toupee. It occupies the 12 sc we have left and
it is divided in two parts. We knit it
directly on the fabric.
10
PINS (x2)
In black
They are made up of four points: 3
large and 1 small:
Big Tips (x3):
1. Magic ring into 6 sc.
2. At 5. 1 sc at each point (6).
We finish off.
Small Tip:
1. Magic ring into 4 sc.
2. At 4. 1 sc at each point.
We will knit the small point and two of the
big and we finish them off. We leave the
last large unfinished tip for
start with the union of the tips:
The procedure is the same as the one
we have previously used for
finger joint.
This time, unlike the fingers,
the tips have different sizes. his
placement to make the union is the
next, from right to left, being
right the one that we have left without
top: big, small, 2 big.
1. With 1 sc we go to the small tip,
we knit 1 more sc, we pass another point with
1 sc and we knit 2 more sc, we go to the
last tip with 1 sc. We knit 5 sc and
we repeat the same sequence on the other
side. We will have 22 points. (3 points
large x 6 sc + 1 small tip x 4
sc).
2. 1 sc at each point (22).
3. 4 sc, 1 dec, “3 sc, dec” 2 times, 4
sc, 1 dec (18).
We finish off.
eleven
TOUPEE
It is divided into 2 parts and we knit it
directly over the 12 points
front.
Big Part:
It occupies 9 sc.
1. We mark the first 9 sc,
starting from the right, placing the
piece with the neck towards us. From the
last marked point (the ninth)
hook the needle and knit 9
strings we attach to the first point
marked with 1 sc, thus forming a circle
18 sc in total.
2. We place the lap marker to
start knitting in the round 1 sc in each
point (18).
3. 1 sc at each point (18).
4. 1 dec, 14 sc, 1 dec (16).
5. 1 sc at each point (16).
6. 1 dec, 12 sc, 1 dec (14).
7. 1 dec, 10 sc, 1 dec (12).
8. 1 dec, 8 sc, 1 dec (10).
9. We close the piece at the beginning, that is
by the initial 18 sc, sewing it to the hair,
to be able to fill ahead as
that we finish off.
10. 1 dec, 6 sc, 1 dec (8).
11. Dec at all points (4).
We finish off. We close if necessary the
hollow with the wool needle.
12
Small part:
It occupies the 3 points we have left in the
part of the toupee.
1. The shape will be the same as we use
in the Big Part. From the third sc
we knit 3 chains to the first to
get a 6 sc piece.
2. We place the lap marker to
knit in the round and we knit 1 inc in each
point (12).
3. AND 4. 1 sc at each point (12).
5. 1 dec, 8 sc, 1 dec (10).
6. We close at the beginning to fill.
7. 1 sc at each point (10).
8. 1 dec, 6 sc, 1 dec (8).
9. 1 sc at each point (8).
10. Dec at all points (4).
We finish off. We close with the wool needle
if required.
Once the hair is complete with all its
pieces we sew it to the head and to
finish it we hook on the side
right, on the temple a thread of wool
black folded in half, forming the 2
hairs.
13
NOSE
In flesh color
1. Magic ring into 6 sc.
2. İnc at all points (12).
3. “2 sc, inc # 3”, repeat until the end of
the turn (20)
Inc # 3 consists of doing 3 sc in the
same point, that is, instead of doing
a normal increase that would be knitting 2
sc at the same point, we will do 3.
4. AND 5. 1 sc at each point (20).
6. “1 dec, 3 sc”, repeat (16).
7. To 10. 1 sc at each point (16).
11. “1 dec, 2 sc”, repeat (12).
12. Dec at all points (6).
We finish off.
Before sewing the nose to the face we must
place the beard as it goes over it,
covering the upper central part.
In black we embroider the mouth, leaving 4 turns approximately apart and 12 sc long.
EARS (x2)
In flesh color
1. Magic ring into 6 sc.
2. İnc at all points (12).
3. To 5. 1 sc at each point (12).
We finish off. We fold in half and
we sew under the sideburns, so that
these are slightly raised by the
ears.
14
EYES (x2)
In white
1. 7 chains on which we knit 6 sc.
2. We continue weaving without turning the piece,
that is, again on the chains of
start, but on the other hand, 1 sc in each
point (6). We will thus have a piece
formed by 12 sc.
3. We place the lap marker to
start knitting in the round. We make 5
sc, 1 dec, 5 sc (11).
We finish off.
In black we embroider the pupil, and once
sewn to the face, upper parts and
lower eye and eyebrows.
TIE
In blue
Knot:
1. 5 chains on which we knit 4 sc.
2. to 4. no separation chain before
turn the piece, we will lose 1 sc in each
row. We do it until we have 1
sc.
5. We place the lap marker to
knit in the round bordering the whole piece
with sc (13).
The last point we stayed
at the end of the lap it will help us to start
the Bottom of the tie, so
we continue weaving:
fifteen
To facilitate the understanding of
instructions, we will do the explanation
figuring that we go up or down the
fabric, if the tie were on.
1. We go down with 7 chains, we go up with 3
sc and make a slip stitch.
2. We keep going down with 7 other chains.
3. We go up with 9 sc and make a point
slipped.
4. Without separation chain, we rotate and
we go down with 6 sc, we make 4 chains and
We went up with 3 sc and a slip stitch.
5. Finally, we go down with 3 sc.
We finish off.
Necktie Necktie:
We start from one of these two points: the
before or after 4 sc
upper knot, that is, we look
in the upper 4 sc of the knot and
we start knitting in the sc before
these 4 or in the next sc.
1. We knit 40 chains and hook on
the other point that we haven’t used of
the 2 proposed.
2. We turn and weave 40 sc on the
chains.
We finish off.
Given the size of the tie, we should
place it around the neck before
sew the head.
AND READY! HAVE FUN!!
Measurements: 35 cm
Difficulty: High
Estimated time: 12 h
Crochet hook: 2-3 mm
VILMA PICAPIEDRA
Amigurumi pattern
Designed by Sueños Blanditos
MATERIALS
– Wool of different colors: white, black,
flesh color, orange, red.
– Wool thickness: 3-4 mm.
– Crochet hook suitable for the thickness of the wool.
– Needle to sew wool.
– Synthetic filling.
ABBREVIATIONS
Sc: low point
İnc: increase / increase
Dec: decrease / decrease
Fill as we knit.
If you have questions about the points you can visit
Tutorial Basic Points for knitting amigurumis
Thank you very much for purchasing my pattern.
I hope you enjoy knitting it!
If you have any questions write me at:
amigurumi @
FEET / LEGS (x2)
In flesh color
Fingers (x3):
1. Magic ring into 4 sc.
2. At 4. 1 sc at each point (4).
We finish off.
We knit two fingers and finish them off,
we leave the third finger unfinished to
start finger joining:
1. With 1 sc we pass to another finger, we knit
one more sc, we go to the third finger with 1
sc, we knit 3 more sc. We repeat for the
the other side the same sequence. We will have
12 points. (3 fingers x 4 sc).
2. “2 sc, dec”, repeat until the end of the
turn (9).
3. AND 4. 1 sc at each point (9).
5. “1 sc, dec”, repeat (6).
6. We divide the piece into two equal parts
3 sc (plant and upper part). We mark
the 3 sc segment to start knitting
the sole of the foot. We knit 1 sc in each
point until reaching the chosen segment in
the one we knit 1 sc in each stitch (3).
7. AND 8. Separation chain, we turn and
knit 1 sc straight in each stitch (3).
9. We place the lap marker to
start knitting in the round bordering the
piece with sc. Thus, we will have: 3 sc + 3 sc
+ 3 sc + 3 sc = 12 sc.
10. “2 sc, 1 dec” 3 times (9).
11. to 17. 1 sc at each point (9).
18. “2 sc, inc”, repeat (12).
19. To 25. 1 sc at each point (12).
26. “3 sc, inc”, repeat (15).
27. At 39. 1 sc at each point (15).
two
40. We change to white and knit 1 sc
at each point (15).
We finish off the first leg, we knit the
second following the same pattern and the
we leave unfinished to start the
Joining the legs.
We put one leg next to the other and
We mark the central point between them.
We knit in the second leg that we leave
without finishing off 1 sc at each point until reaching
to the marked point.
We pass with 1 sc to the first leg.
We knit 1 sc in each stitch until
get back to the marked point,
we pass with 1 sc to the second leg and
we complete the union.
We close the gap between the legs with the
wool needle. We continue weaving the
BODY
1. In total we will have 30 sc.
2. At 6. 1 sc at each point (30).
7. “3 sc, dec”, repeat (24).
8. “2 sc, dec”, repeat (18).
9. We knit on top of the
chains 1 sc at each point. We will return to
this turn to knit the skirt (18).
10. “2 sc, inc”, repeat (24).
11. To 15. 1 sc at each point (24).
16. We are going to knit the neckline. For it
we divide the piece into two equal parts of
12 sc (front and rear half).
We mark the beginning and end of the segment.
In the mark that we place on the side
doll right we start knitting
in flesh color, the point itself marked,
as well as the previous and the later. The rest
of the return we will make it blank (24). You
I recommend leaving the marks for
guide us through them later.
3
17. In the front segment we knit “1 sc,
inc ”6 times, changing to the flesh color when
corresponds, as established in the return
previous. The rest we knit in white. (30).
We will start in the following rounds to
add flesh-colored sc at the beginning and / or at the end of
those already woven in this color to form the neckline
diagonal.
18. In this round we knit 1 sc in each stitch,
but we will change to the flesh color, adding 1
sc of this color at the end of which we have already
fabric (30).
19. In this round we will add 1 sc of flesh color
at the beginning and another at the end of those already woven in this
color (30).
20. We add 1 sc of meat color at the end (30).
21. We add 1 sc at the beginning and another at the end (30).
22. We add 1 sc of meat color at the end (30).
23. Guiding us by the marks we have left
on lap 16 we marked the front segment
which now has 18 sc and we knit over it “1 sc,
dec ”6 times, adding 1 sc of flesh color to the
end of which we already have (24).
24. We continue adding meat-colored sc, in
this time will be 1 at the beginning and 2 at the end (24).
25. In this round we add 2 sc at the beginning and
another 2 sc at the end (24).
26. We knit “2 sc, dec”, repeat, changing
color when applicable, but without adding any
sc (18).
27. We add 2 sc at the beginning and 2 sc at the end (18).
28. From this round on we will only knit
in flesh color, 1 sc at each point (18).
29. “4 sc, dec”, repeat (15).
30. 1 sc at each point (15).
We finish off.
4
WE COMPLETE THE DRESS:
Neckline (optional):
In white
So that the final result is better,
we have the option to knit directly
on the fabric, with sc, outlining the
color change between points
thus forming a border throughout
cleavage. We will do it by placing the
doll with feet down.
Skirt:
In white
1. We start from round 9 of the body and with
wrist feet up come on
to knit in the part of the chains that
leave free, 1 sc at each point (18).
2. “2 sc, inc”, repeat (24).
3. “3 sc, inc”, repeat (30).
4. “4 sc, inc”, repeat (36).
5. “5 sc, inc”, repeat (42).
6. At 12. 1 sc at each point (42).
13. “5 sc, dec”, repeat (36).
We knit the Tips (x9):
Without finishing off we went on to knit the First Point:
1. 5 sc.
2. To 5. Without a separation chain we will lose 1 sc in each row until we only have 1
sc.
We finish off.
To knit the following ends, we will hook the last sc of the previous point, that is why they are
9 points in total, since each one occupies 4 sc.
At the end of the last point, we do not finish, but we border with sc to outline the edges.
HEAD
In flesh color
1. Magic ring into 6 sc.
2. İnc at all points (12).
3. “1 sc, inc”, repeat (18).
4. “2 sc, inc”, repeat (24).
5. “3 sc, inc”, repeat (30).
6. “4 sc, inc”, repeat (36).
7. At 20. 1 sc at each point (36).
21. “2 sc, inc” 6 times, 1 sc at each point
in the rest of the lap (42).
22. “3 sc, inc” 6 times, 1 sc at each point
in the rest of the lap (48).
23. To 25. 1 sc at each point (48).
26. 2 sc, “3 sc, dec” 6 times, 1 sc in each
stitch in remainder of round (42).
27. 2 sc, “2 sc, dec” 6 times, 1 sc in each
stitch in remainder of round (36).
28. 1 sc at each point (36).
29. “4 sc, dec”, repeat (30).
30. “3 sc, dec”, repeat (24).
31. “2 sc, dec”, repeat (18).
32. “4 sc, dec”, repeat (15).
33. To 35. 1 sc at each point (15).
We finish off.
6
HAIR
In orange
1. Magic ring into 6 sc.
2. İnc at all points (12).
3. “1 sc, inc”, repeat (18).
4. “2 sc, inc”, repeat (24).
5. “3 sc, inc”, repeat (30).
6. “4 sc, inc”, repeat (36).
7. 1 sc at each point (36).
8. 24 sc (we leave 12 sc without weaving).
9. To 20. Separation chain, we turn
and we knit 1 sc in each stitch (24).
21. AND 22. Without a separation chain,
we turn and knit 1 dec. We make 1
sc at each stitch and we knit 2 dec
finals with the last 4 sc. We lose
in this way 4 sc in each row. (twenty),
(16).
23. to 28. Chain of separation,
we turn and knit 1 sc in each stitch
(16).
29. AND 30. Without separation chain,
we turn and knit 1 dec. We make 1
sc at each stitch and we knit 2 dec
finals with the last 4 sc. We lose
again 4 sc in each row. (12), (8).
7
31. We place the marker and start
to knit in the round bordering with sc (23
sc + 12 sc + 23 sc + 8 sc = 66 sc).
We finish off.
FRINGE
In orange
1. We knit it over the front 12 sc
that we leave without weaving when making hair.
Placing hair with the Magic ring into start
towards us, looking at it from above,
we hooked on the last sc of the 12 (the
last to our left) and we do 12
chains, to hook to the other side, in the
first of the 12 sc, thus forming a
piece of 24 points in total.
2. We place the lap marker on the
point where we have stayed for
start knitting in the round, 1 sc in each
point (24).
3. “3 sc, inc”, repeat (30).
4. “4 sc, inc”, repeat (36).
5. “5 sc, inc”, repeat (42).
6. At 15. 1 sc at each point (42).
We can close the initial part, sewing the
start strings to the big piece of the
hair.
16. “5 sc, dec”, repeat (36).
17. “4 sc, dec”, repeat (30).
18. “3 sc, dec”, repeat (24).
19. “2 sc, dec”, repeat (18).
20. “1 sc, dec”, repeat (12).
21. Dec at all points (6).
We finish off. We close.
MONKEY
In orange
1. Magic ring into 6 sc.
2. İnc at all points (12).
3. “1 sc, inc”, repeat (18).
4. “2 sc, inc”, repeat (24).
5. “3 sc, inc”, repeat (30).
6. At 12. 1 sc at each point (30).
13. “3 sc, dec”, repeat (24).
14. “2 sc, dec”, repeat (18).
15. “1 sc, dec”, repeat (12).
We finish off.
ARMS (x2)
In flesh color
Thumb:
1. Magic ring into 4 sc.
2. At 4. 1 sc at each point (4).
We finish off.
Fingers (x3):
1. Magic ring into 4 sc.
2. At 5. 1 sc at each point (4).
We finish
We knit two fingers and finish them off,
we leave the last finger unfinished to
start finger joining:
9
1. With 1 sc we move to another finger,
we knit 1 more sc, we pass to the third finger
with 1 sc, we knit 3 more sc. We repeat the
same sequence on the other side.
We will have 12 points. (3 fingers x 4 sc).
(12).
2. At 5. 1 sc at each point (12).
6. “2 sc, dec”, repeat (9).
7. “1 sc, dec”, repeat (6).
8. At 28. 1 sc at each point (6).
We finish off. We close the gap with the
wool needle.
NECKLACE
Stones (x6):
In white
1. Magic ring into 6 sc.
2. 1 inc, 2 sc, 2 inc, 1 sc (9).
3. 2 dec, 5 inc (12).
4. 1 dec, 4 sc, 2 dec, 2 sc (9).
5. 2 sc, 3 dec, 1 sc (6).
We finish off. We close the gap with the
wool needle.
We will join the stones to form the necklace
introducing a strand of white wool to
through them. To give it a more aspect
uneven, being stones,
we will try to place them in different
positions.
10
EYES (x2)
In black
We knit a Magic ring into 6 sc.
We finish off.
NOSE
In flesh color
1. Magic ring into 6 sc.
2. 1 sc at each point (6).
We finish off.
ASSEMBLY OF THE PARTS AND
FINAL DETAILS
HAIR:
We sew it to the head in the part of the
nape on lap 27, that is to 8 turns
end. On the forehead we sew it around the corner
3 approximately.
The bangs must be raised and sewn
back to the magic ring into the hair
We will do round 9 of the bangs.
Finally, we sew the bun from the
round 6 to 10 of the hair.
FACE:
We sew our eyes from lap 11 to
15 of the head, leaving 4 sc of
separation between them.
We embroider the eyebrows in black over the eyes
from lap 6 to 8, with a length
3 sc.
eleven
We place the nose, just above the
cheeks, from lap 17 to 20. Two
sc of separation we will embroider in red the
lips, 7 sc long and 3 sc high.
Inside we embroider in white.
NECKLACE:
We put it on the neck before sewing
head, closing the strand of wool
white with a knot.
ARMS:
We sew them leaving 7 sc of separation
with respect to the neck, that is, in the
turn in which we reduce the chest.
Measurements: 25 cm
Difficulty: High
Estimated time: 9 h
Crochet hook: 2-3 mm
PABLO MARMOL
Amigurumi pattern
Designed by Sueños Blanditos
MATERIALS
– Wool of different colors: black,
light brown, yellow, flesh color, flesh color
darker.
– Wool thickness: 3-4 mm.
– Crochet hook suitable for the thickness of the wool.
– Needle to sew wool.
– Synthetic filling.
ABBREVIATIONS
Sc: low point
İnc: increase / increase
Dec: decrease / decrease
Fill as we knit.
If you have questions about the points you can visit
Tutorial Basic Points for knitting amigurumis
Thank you very much for purchasing my pattern.
I hope you enjoy knitting it!
If you have any questions write me at:
amigurumi @
FEET / LEGS
Fingers (x3):
In flesh color
1. Magic ring into 8 sc.
2. At 4. 1 sc at each point (8).
We finish off.
We knit two fingers and finish them off,
we leave the third finger unfinished to
start finger joining:
1. With 1 sc we pass to another finger, we knit
3 more sc and go to the last finger with 1
sc. We knit 7 sc and repeat the same
sequence on the other side. We will have 24
points. (3 fingers x 8 sc).
2. “2 sc, dec”, repeat until the end of the
turn (18).
3. 1 sc at each point (18).
4. We mark the first corner from the
needle position, i.e. the first
corner we would reach if
continue to knit and knit 1 sc in
each point until you reach it.
5. Once in the corner we make a
chain is separated and we turn, to
start knitting straight 9 sc (9).
6. AND 7. Separation chain, we turn and
knit 1 sc in each stitch (9).
8. Separation chain, we rotate and
we skirt the whole piece with sc (28).
9. We place the lap marker, because
we knit again in the round. We make 8
sc, 1 dec, 16 sc, 1 dec (26).
10. 1 sc at each point (26).
11. 1 dec, 2 sc, 1 dec, 2 sc, 1 dec, 16
sc (23).
12. 1 dec, 4 sc, 1 dec, 15 sc (21).
two
13. “5 sc, dec”, repeat (18).
14. 1 sc at each point (18).
15. “2 sc, inc”, repeat (24).
16. To 22. 1 sc at each point (24).
23. “6 sc, dec”, repeat (21).
24. To 26. 1 sc at each point (21).
27. “5 sc, dec”, repeat (18).
28. At 32. 1 sc at each point (18).
33. We change to light brown and knit 1
sc at each point (18).
We finish off the first leg.
We knit the second following the same
pattern and leave it unfinished to
start joining the legs:
We put one leg next to the other and
We mark the central point between them.
We knit in the second leg that we leave
without finishing off 1 sc at each point until reaching
to the marked point. We go with 1 sc to the
first leg. We knit in it 1 sc in
each point until you get back to the point
marked, we go with 1 sc to the second
leg and complete the union.
We close the gap between the legs with the
wool needle. We continue weaving the
BODY:
1. In total there will be 36 points.
2. “5 sc, inc”, repeat (42).
3. “6 sc, inc”, repeat (48).
4. “7 sc, inc”, repeat (54).
5. “8 sc, inc”, repeat (60).
6. 1 sc at each point (60).
7. We change to the flesh color and knit 1
sc at each point (60).
8. At 22. 1 sc at each point (60).
23. “8 sc, dec”, repeat (54).
24. “7 sc, dec”, repeat (48).
25. On top of the chains
knit 1 sc in each stitch (48).
We will return to this round to knit the
dress.
We finish off.
DRESS
In light brown
1. We start from lap 25 of the body and
we will knit with the doll’s feet towards
above, in the part of the chains that
was released.
We don’t weave over it, but we do
13 chains out of it. We go back to
hook on the fabric once overcome
the central sc and we finish the round with
1 sc at each point (60).
2. In this round we will knit in the
top of the chains 1 sc in
each point. We can’t do this
on the 13 central chains. On
we knit 1 sc, “1 sc, dec” 4
times, which will leave us with 9 sc in the
neckline. (56). We will return to this return
to complete the neckline of the dress.
3. On the 9 sc of the neckline we knit “1
sc, dec ”3 times. We will do 1 sc in
each stitch in the rest of the round (53).
4. 1 sc at each point (53).
5. 1 inc, “8 sc, inc” 5 times, 6 sc, 1
inc (60).
6. “9 sc, inc”, repeat (66).
4
7. “10 sc, inc”, repeat (72).
8. To 25. 1 sc at each point (72).
Without finishing off, we will knit the First
Tip:
In light brown
1. 6 sc.
2. To 6. Without separation chain
we will lose 1 sc in each row until
we only have 1 sc.
We finish off.
Then in the next sc
we start knitting another point. Total
We will make 12 points.
When knitting the last point, we do not finish,
but we border all with sc to
refine the silhouette.
WE COMPLETE THE NECK
OF THE DRESS
In light brown
1. We start from round 2 of the dress and
with the doll’s feet down
we knit in the part of the chains that
was released. Seeing the doll of
front, we hook to the left of the
neckline that we will leave unwoven. We knit
1 sc at each point (47).
2. Without separation chain, we rotate and
knit 1 sc in each stitch (46).
3. Without separation chain, we rotate and
knit 1 sc in each stitch (45).
We finish
In black we embroider the ribbons under the
neckline.
5
ARMS (x2)
Fingers (x3):
In flesh color
1. Magic ring into 6 sc.
2. At 5. 1 sc at each point (6).
We knit two fingers and finish them off,
we leave the third finger unfinished to
start finger joining:
1. With 1 sc we move to another finger,
we knit 2 more sc, we go to the third
finger with 1 sc and we knit 5 more sc.
We repeat the same sequence for the
other side. We will have 18 points. (3
fingers x 6 sc).
2. At 5. 1 sc at each point (18).
6. “4 sc, dec”, repeat (15).
7. “3 sc, dec”, repeat (12).
8. 1 sc at each point (12).
9. “1 sc, inc”, repeat (18).
10. To 24. 1 sc at each point (18).
25. “1 sc, dec”, repeat (12).
26. We change to light brown and
knit 1 sc in each stitch (12).
27. On top of the chains
knit 1 sc in each stitch (12).
We will return to this return for
complete the sleeve.
We finish off.
Thumb:
1. Magic ring into 8 sc.
2. At 4. 1 sc at each point (8).
We finish
6
WE COMPLETE THE SLEEVE:
1. We start from lap 27 of the arms
and with the doll’s hands up,
we knit in the part of the chains that
1 sc, 1 double double, 2 sc, 2
double double crochet, 2 sc, 2 double double crochet, 2
sc.
We finish off.
HEAD
In flesh color
1. Magic ring into 6 sc.
2. İnc at all points (12).
3. “1 sc, inc”, repeat (18).
4. “2 sc, inc”, repeat (24).
5. “3 sc, inc”, repeat (30).
6. “4 sc, inc”, repeat (36).
7. To 10. 1 sc at each point (36).
11. “11 sc, inc”, repeat (39).
12. To 14. 1 sc at each point (39).
15. “12 sc, inc”, repeat (42).
16. To 20. 1 sc at each point (42).
21. “13 sc, inc”, repeat (45).
22. To 25. 1 sc at each point (45).
26. “14 sc, inc”, repeat (48).
27. At 30. 1 sc at each point (48).
We finish off.
BEARD
A little darker in flesh color
1. 19 chains that we weave 18
sc.
2. Separation chain, we rotate and
knit 1 sc in each stitch (18).
3. Without making chain before turning and
doing a decrease with the 2
last sc, we will lose 2 sc (16).
4. AND 5. Separation chain, we turn and
knit 1 sc in each stitch (16).
6. We lose 2 sc again as we have
done in row 3 (14).
7. AND 8. Separation chain, we turn and
knit 1 sc in each stitch (14).
9. We lose another 2 sc (12).
10. AND 11. Separation chain, we rotate
and we knit 1 sc in each stitch (12).
12. We place the lap marker
to pass to knit in the round bordering
the whole piece with sc.
We finish off.
We will place on the face in such a way
that the part of the start strings is
placed above and the bottom is
tied with the end of the head.
HAIR
In yellow
1. Magic ring into 6 sc.
2. İnc at all points (12).
3. “1 sc, inc”, repeat (18).
4. “2 sc, inc”, repeat (24).
8
5. “3 sc, inc”, repeat (30).
6. “4 sc, inc”, repeat (36).
7. “5 sc, inc”, repeat (42).
8. 1 sc at each point (42).
9. 12 sc (we leave the rest unwoven).
10. and 11. Separation chain, we turn
and we knit 1 sc in each stitch (12).
12. We place the lap marker
to knit in the round and we skirt the
piece with sc. (48).
We finish off.
To facilitate the assembly of the different
parts of the hair we will be guided by the
next division of the 48 points that
we have:
• The nape part consists of 18 sc and
on it we will not add any piece.
• Below are the Patillas, one by
each side. Its space consists of 9
sc each. We will sew upon them the
corresponding piece of 18 sc folded
to the half.
• Finally we have the front, the
Toupee. It occupies the 12 sc we have left and
we knit it directly on the fabric.
PINS (x2)
In yellow
They consist of three points: 2 large
and 1 small
Big Tips (x2):
1. Magic ring into 8 sc.
2. At 5. 1 sc at each point (8).
We finish off.
9
Small Tip:
1. Magic ring into 4 sc.
2. At 4. 1 sc at each point.
We will knit the small point and one of the
big and we finish them off. We leave the other
large unfinished tip to start
With the union of the tips:
The procedure is the same as the one
we have previously used for
finger joint.
This time, unlike the fingers,
the tips have different sizes. his
placement to make the union is the
next: big, small, big.
1. With 1 sc we go to the small tip,
we knit 1 more sc, we pass to the other
point with 1 sc and we knit 7 more sc.
We repeat the same sequence for the other
side. We will have 20 points. (2 points
large x 8 sc + 1 small tip x 4
sc).
2. 1 sc at each point (20).
3. “8 sc, dec”, 2 times (18).
We finish off.
TOUPEE
In yellow
We knit it directly on the 12 sc
front.
1. We mark the 12 sc, placing the piece
with the neck towards us. From the
last marked point (the 12)
hook the needle and knit 12
strings we attach to the first point
marked with 1 sc, thus forming a
24 sc circle in total.
10
2. We place the lap marker to
start knitting in the round 1 sc in each
point (24).
3. 1 sc at each point (24).
4. 10 sc, 2 dec, 10 sc (22).
5. 11 sc, 2 dec, 7 sc (20).
6. 11 sc, 2 dec, 5 sc (18).
7. “1 sc, dec”, repeat (12).
8. We close the piece at the beginning, that is
for the initial 24 sc, sewing it to the hair,
to be able to fill ahead as
that we finish off.
9. Dec at all points (6).
We finish off. We close the gap with the
wool needle.
Once the hair is complete with all its
pieces we sew it to the head and to
finish it we hook on the side
right, on the temple a thread of wool
black folded in half, forming the 2
hairs.
EARS (x2)
In flesh color
1. Magic ring into 6 sc.
2. İnc at all points (12).
3. and 4. 1 sc at each point (12).
We finish off. We fold in half and
we sew under the sideburns, so that
these are slightly raised by the
ears.
NOSE
In flesh color
1. Magic ring into 6 sc.
2. İnc at all points (12).
3. At 10. 1 sc at each point (12).
We finish off.
We place it on the beard, in the part
central, just on the edge of it.
EYES (x2)
We embroider them in black. Occupy 3
sc wide and 5 sc high and
we place on both sides of the nose, 3
rows above the beard, leaving 6 sc
of separation between them.
We will also embroider in the same color as
eyebrows and mouth.
The eyebrows will go 2 rows above the
eyes, while the mouth will have 9 sc of
long, its central part being less than
a distance of 8 sc from the upper edge
of the beard.
AND READY! HAVE FUN!!
Measurements: 30 cm
Difficulty: High
Estimated time: 12 h
Crochet hook: 2-3 mm
BETYY MARBLE
Amigurumi pattern
Designed by Sueños Blanditos
MATERIALS
– Wool of different colors: white, black,
flesh color, sky blue, red.
– Wool thickness: 3-4 mm.
– Crochet hook suitable for the thickness of the wool.
– Needle to sew wool.
– Synthetic filling.
ABBREVIATIONS
Sc: low point
İnc: increase / increase
Dec: decrease / decrease
Fill as we knit.
If you have questions about the points you can visit
Tutorial Basic Points for knitting amigurumis
Thank you very much for purchasing my pattern.
I hope you enjoy knitting it!
If you have any questions write me at:
amigurumi @
FEET / LEGS (x2)
In flesh color
Fingers (x3):
1. Magic ring into 4 sc.
2. At 4. 1 sc at each point (4).
We finish off.
We knit two fingers and finish them off,
we leave the third finger unfinished to
start finger joining:
1. With 1 sc we pass to another finger, we knit
one more sc, we go to the third finger with 1
sc, we knit 3 more sc. We repeat for the
the other side the same sequence. We will have
12 points. (3 fingers x 4 sc).
2. “2 sc, dec”, repeat until the end of the
turn (9).
3. AND 4. 1 sc at each point (9).
5. “1 sc, dec”, repeat (6).
6. We divide the piece into two equal parts
3 sc (plant and upper part). We mark
the 3 sc segment to start knitting
the sole of the foot. We knit 1 sc in each
point until reaching the chosen segment in
the one we knit 1 sc in each stitch (3).
7. AND 8. Separation chain, we turn and
knit 1 sc straight in each stitch (3).
9. We place the lap marker to
start knitting in the round bordering the
piece with sc. Thus, we will have: 3 sc + 3 sc
+ 3 sc + 3 sc = 12 sc.
10. “2 sc, 1 dec” 3 times (9).
11. to 17. 1 sc at each point (9).
18. “2 sc, inc”, repeat (12).
19. To 25. 1 sc at each point (12).
26. “3 sc, inc”, repeat (15).
27. At 39. 1 sc at each point (15).
two
40. We change to white and knit 1 sc
at each point (15).
We finish off the first leg, we knit the
second following the same pattern and the
we leave unfinished to start the
Joining the legs.
We put one leg next to the other and
We mark the central point between them.
We knit in the second leg that we leave
without finishing off 1 sc at each point until reaching
to the marked point.
We pass with 1 sc to the first leg.
We knit 1 sc in each stitch until
get back to the marked point,
we pass with 1 sc to the second leg and
we complete the union.
We close the gap between the legs with the
wool needle. We continue weaving the
BODY
1. In total we will have 30 sc.
2. At 6. 1 sc at each point (30).
7. “3 sc, dec”, repeat (24).
8. We change to light blue and weave “2
sc, dec ”, repeat (18).
9. We knit on top of the
chains 1 sc at each point. We will return to
this turn to knit the skirt (18).
10. “2 sc, inc”, repeat (24).
11. to 17. 1 sc at each point (24).
18. We are going to knit the neckline. For it
we divide the piece into two equal parts of
12 sc (front and rear half).
We mark the beginning and end of the segment.
In the front segment we are going to do the
chest and for this we knit “1 sc, inc” in
light blue color while on the other
half, that is to say in the rear segment,
we will knit in flesh color the 12 sc that
form (30) .I recommend you leave the
brands to guide us more
ahead.
3
19. We are going to start adding color sc
meat at the beginning and / or end of the segment
blue forward which is now made up of
18 sc, thus shaping the neckline. In this
back we will add 2 sc of flesh color to
beginning and another 2 sc at the end of the segment
blue which now has 18 sc (30).
20. AND 21. On these laps we will add 2 sc
flesh-colored at the beginning and 1 at the end of the
already woven in this color (30).
22. Guided by the brands we have
left on lap 18 we mark the
front segment now 18 sc and
we knit over it “1 sc, dec” 6 times, (24).
23. We continue adding color sc
meat, this time it will be 2 at the beginning and 1
at the end (24).
24. As of this return only
we will knit in flesh color, 1 sc in each
point (24).
25. And 26. 1 sc at each point (24).
27. “2 sc, dec”, repeat (18).
28. At 30. 1 sc at each point (18).
We finish off.
4
WE COMPLETE THE DRESS
Neckline (optional):
In light blue
So that the final result is better,
we have the option to knit directly
on the fabric, with sc, outlining the
color change between points
thus forming a border throughout
cleavage. We will do it by placing the
doll with feet down.
Skirt:
In light blue
1. We start from round 9 of the body and with
wrist feet up come on
to knit in the part of the chains that
leave free, 1 sc at each point (18).
2. “2 sc, inc”, repeat (24).
3. “3 sc, inc”, repeat (30).
4. “4 sc, inc”, repeat (36).
5. “5 sc, inc”, repeat (42).
6. At 12. 1 sc at each point (42).
13. “5 sc, dec”, repeat (36).
We knit the Tips (x9):
Without finishing off, we will knit the
First Tip:
1. 5 sc.
2. To 5. Without separation chain
we will lose 1 sc in each row until
that we only have 1 sc.
We finish off.
5
To knit the following ends, we are going to
hook on the last sc of the tip
previous, that’s why there are 9 points in total, since
that each one occupies 4 sc.
At the end of the last point, we do not finish,
but we border with sc to outline
the edges.
HEAD
In flesh color
1. Magic ring into 6 sc.
2. İnc at all points (12).
3. “1 sc, inc”, repeat (18).
4. “2 sc, inc”, repeat (24).
5. “3 sc, inc”, repeat (30).
6. “4 sc, inc”, repeat (36).
7. “5 sc, inc”, repeat (42).
8. “6 sc, inc”, repeat (48).
9. To 18. 1 sc at each point (48).
19. “3 sc, inc” 6 times, 1 sc in each
stitch in remainder of round (54).
20. “4 sc, inc” 6 times, 1 sc in each
stitch in remainder of round (60).
21. To 23. 1 sc at each point (60).
24. 2 sc, “4 sc, dec” 6 times, 1 sc in
each stitch in the rest of the round (54).
25. 2 sc, “3 sc, dec” 6 times, 1 sc in
each stitch in the rest of the round (48).
26. “6 sc, dec”, repeat (42).
27. “5 sc, dec”, repeat (36).
28. “4 sc, dec”, repeat (30).
29. “3 sc, dec”, repeat (24).
30. “2 sc, dec”, repeat (18).
We finish off.
6
HAIR
In black
1. Magic ring into 6 sc.
2. İnc at all points (12).
3. “1 sc, inc”, repeat (18).
4. “2 sc, inc”, repeat (24).
5. “3 sc, inc”, repeat (30).
6. “4 sc, inc”, repeat (36).
7. “5 sc, inc”, repeat (42).
8. “6 sc, inc”, repeat (48).
9. AND 10. 1 sc at each point (48).
Next we are going to divide the piece into
2 parts:
• 18 sc bangs.
• 30 sc mane.
For this we mark the point at which we
we stayed (the sc of the lap marker)
and we count the previous 17 sc,
thus marking the segment in which
we will weave the bangs of 18 sc.
In the rest of the piece we will knit
The Mane:
Once the bangs are marked, we continue
weaving 30 sc. Next we do
30 chains and hook with 1 sc to
start, at the point before the marking,
thus forming a circular piece of 60
points.
We will knit with the ring placed towards
we.
1. We place the lap marker to
Work 1 sc in the round in each stitch (60).
2. “5 sc, inc”, repeat (70).
3. “6 sc, inc”, repeat (80).
7
4. “7 sc, inc”, repeat (90).
5. At 15. 1 sc at each point (90).
We can proceed to close the piece by
the beginning, that is, sewing the chains of
start to hair.
16. “13 sc, dec”, repeat (84).
17. “12 sc, dec”, repeat (78).
18. “11 sc, dec”, repeat (72).
19. “10 sc, dec”, repeat (66).
20. “9 sc, dec”, repeat (60).
21. We are going to divide the piece into 2 parts
equal (the one above or outside and the
bottom or inside) of 30 sc each.
We will knit on the bottom “3 sc, dec”
6 times, 1 sc at each point in the rest of
the turn (54).
22. Now the bottom segment has 24
sc. Over them we knit “2 sc, dec” 6
times 1 sc at each point in the rest of
the turn (48).
23. Our segment now has 18 sc.
On them we knit “1 sc, dec” 6 times.
In the rest of the round we knit “3 sc,
dec ”6 times (36).
We finish off. Fill the piece and
we close sewing straight.
8
FRINGE
In black
1. We knit it over the front 18 sc
that we have marked. Placing hair
with the magic ring into start towards us,
looking at it from above, we hooked on
the last sc of the 18 (the last to our
left) and we make 18 chains, to
hook to the other side, on the first of
the 18 sc, thus forming a piece of 36
points in total.
2. We place the lap marker on the
point where we have stayed for
start knitting in the round, sc 1 in
each point (36).
3. 15 sc, 3 inc, “2 sc, inc” 6 times (45).
4. 15 sc, 6 inc, “3 sc, inc” 6 times (57).
5. “4 sc, inc” 3 times, 1 sc in each
stitch in remainder of round (60).
6. 20 sc, 2 dec, 4 sc, 2 dec, 1 sc in
each stitch in the rest of the round (56).
7. 20 sc, 2 dec, 2 sc, 2 dec, 1 sc in
each stitch in the rest of the round (52).
8. “1 sc, dec” 7 times, 2 dec, “1 sc,
dec ”9 times (34).
We can now close the piece by
the beginning, that is, sewing the chains of
start to hair.
9. “1 sc, dec” 4 times, 3 dec, “2 sc,
dec ”4 times (23).
10. “1 sc, dec” 3 times, 1 dec, “1 sc,
dec ”4 times (15).
11. “3 sc, dec” 3 times (12).
12. Dec at all points (6).
We finish off.
We close the hole with the wool needle.
9
ARMS (x2)
In flesh color
Thumb:
1. Magic ring into 4 sc.
2. At 4. 1 sc at each point (4).
We finish off.
Fingers (x3):
1. Magic ring into 4 sc.
2. At 5. 1 sc at each point (4).
We finish off.
We knit two fingers and finish them off,
we leave the last finger unfinished to
start finger joining:
1. With 1 sc we move to another finger,
we knit 1 more sc, we pass to the third finger
with 1 sc, we knit 3 more sc. We repeat the
same sequence on the other side.
We will have 12 points. (3 fingers x 4 sc).
(12).
2. At 5. 1 sc at each point (12).
6. “2 sc, dec”, repeat (9).
7. “1 sc, dec”, repeat (6).
8. At 28. 1 sc at each point (6).
We finish off. We close the gap with the
wool needle.
NECKLACE
In white
1. Magic ring into 6 sc.
2. “1 inc, 2 sc”, repeat (8).
3. 1 sc, we change to black and knit 30
chains, hooking with 1 point
slipped into the same sc of the ring.
We finish off.
10
TIE
It consists of 2 parts:
In light blue
1. Magic ring into 6 sc.
2. İnc at all points (12).
3. 4 sc (we leave the rest unwoven).
4. Separation chain, we rotate and
knit 1 sc in each stitch (4).
5. Without separation chain and making 1
final dec with the last 2 sc,
we will lose 2 sc (2).
We finish off.
EYES (x2)
In white
1. Magic ring into 6 sc.
2. İnc at all points (12).
We finish
In black
We knit a Magic ring into 4 sc.
We finish off.
We sew the two parts, placing the
pupil in the lower area.
NOSE
In flesh color
1. Magic ring into 6 sc.
2. 1 sc at each point (6).
We finish off.
eleven
ASSEMBLY OF THE PARTS AND
FINAL DETAILS
HAIR:
We place it giving its characteristic
curved shape at the back, like
shown in the pictures, in order to
sew more easily.
We sew it to the head in the part of the
nape on lap 23, that is to say 7 turns
end. On the forehead we join him around
7 approximately.
We sew the mane by folding the ends,
in such a way that we join below 7
end points.
12
FACE:
We sew our eyes from lap 13 to
19 of the head, leaving 5 sc of
separation between them.
We embroider the upper half in black.
We also embroider the eyebrows in black
over the eyes from lap 10 to 11,
with a length of 4 sc.
We place the nose, in line with the start
of the cheeks, from lap 19 to 20.
Two sc apart we will embroider in
red lips, 6 sc long and 3 sc
high. Inside we embroider in white.
TIE:
We sew it between rounds 9 and 10 of
hair, that is, before making the division.
NECKLACE:
We put it on the neck before sewing
the head, attaching the stone to the tip of the
neckline.
ARMS:
We sew them leaving 5 sc of separation
with respect to the neck.